Thursday, 13 August 2020

LOG ALL SESSION OUTPUT USING PUTTY

I use Putty for getting telnet and SSH connection to the devices under my administration.

For those who are unware of what Putty is - Putty is one of the best Telnet and SSH Client.

Every Network Engineer won't mind saving all the session output logs he has worked on .

The session logs are saved on your desktop disk.

There are many Advantage of SAVING ALL THE SESSION LOGS

+ You can refer to those sesssion in case you have to check some (some mistakes you made)

+ Evidence of the configuration and checks you performed.

+ many more

Lets Configure Putty to log all your session output

+ Open Putty

+ Session  -> Logging

+ Using Putty Parameters for log setting - 'E:\Puttylogs\&H-&Y&M&D-&T.log' which means'
 

&H = Hostname
&Y = Year
&M = Month
&D = Day
&T = Time


+ Then save this log settings to the Default setting 


Now every new Putty session logs output will be automatically save on the disk of your computer .

Saturday, 8 August 2020

Enabling SSH

 Troubleshoot Ticket 


Network Team uses telnet (port 23) to login in the device 10.1.1.1

Need to restrict the use of telnet since telnet is not secure ; session is not encrypted

Enable ssh (port 22) which is secure protocol and where the session is encrypted

Can be configured in working hours since no downtime is required 

========================================================

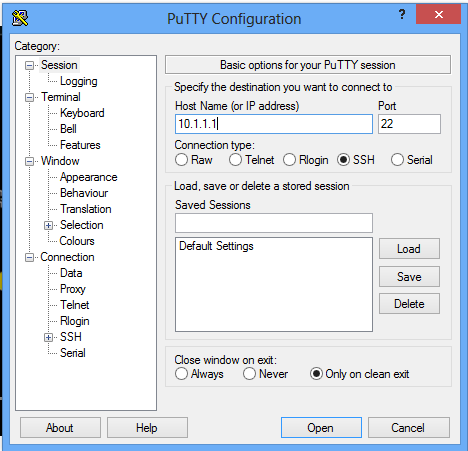
Lets open Putty and try to login via ssh to device 10.1.1.1

Here we can see we are getting error - Connection refused which means ssh is not enabled on the device

10.1.1.1 and to solve it we need to enable ssh 


Now lets try to login via telnet 


We are able to login via telnet !


So lets enable SSH 

Telnet session is insecure because the information is in the clear text 

For SSH session that is not the case , for ssh session the information is encrypted  .

To encrypt / decrypt any information or data we need to generate certain keys which are associated with the hostname and domain name . 

 So lets first configure a hostname and domain name for the device

R1(config)#hostname PUNE_ROUTER
PUNE_ROUTER(config)#
PUNE_ROUTER(config)#ip domain name amartechstuff.net
PUNE_ROUTER(config)#

Note:- I am just configuring a random domain name . If you are working in real environment your 

organization will have valid public domain name .

Now lets  move forward and generate crypto keys which will be used to encrypt / decrypt the information 

PUNE_ROUTER(config)#crypto key generate rsa
The name for the keys will be: PUNE_ROUTER.amartechstuff.net
Choose the size of the key modulus in the range of 360 to 4096 for your
  General Purpose Keys. Choosing a key modulus greater than 512 may take
  a few minutes.

How many bits in the modulus [512]: 1024
% Generating 1024 bit RSA keys, keys will be non-exportable...
[OK] (elapsed time was 1 seconds)

PUNE_ROUTER(config)#
*Aug  8 12:16:18.659: %SSH-5-ENABLED: SSH 1.99 has been enabled
PUNE_ROUTER(config)#^Z

You can see that the name of the key is PUNE_ROUTER.amartechstuff.net i.e 

hostname + domain name 

Lets see the key 

PUNE_ROUTER#sh ip ssh
SSH Enabled - version 1.99
Authentication timeout: 120 secs; Authentication retries: 3
Minimum expected Diffie Hellman key size : 1024 bits
IOS Keys in SECSH format(ssh-rsa, base64 encoded):
ssh-rsa AAAAB3NzaC1yc2EAAAADAQABAAAAgQDfHDOhreEAVbaifqV56LS1qTGicGEC+2s0EqRwA4Ef
qIh8DS029RxkaLYll4iKlxkdJ6Qu/TphdbefEmpSidzVu+gJ80NUUxmlpiMGtF0SY5Yzd6VCsvyRFQo8
dwsdioq686NK+UpYGh46mM3GxP2cDKuvT7ytdDlBSgnsWKn04w==
PUNE_ROUTER#


Now the next and last step is to check and enable ssh under line vty 

line vty 0 4
 login local
 transport input telnet
line vty 5 15
 login local
 transport input telnet

Now we can see that telnet is configured .

Lets change it to ssh

PUNE_ROUTER#config
Configuring from terminal, memory, or network [terminal]?
Enter configuration commands, one per line.  End with CNTL/Z.
PUNE_ROUTER(config)#line vty 0 15
PUNE_ROUTER(config-line)#transport input ssh
PUNE_ROUTER(config-line)#^Z

Now lets check whether ssh is enabled or not 


https://networkengineerstuff.blogspot.com


Thursday, 6 August 2020

Using Straight Cable & Crossover Cable

Need to connect two devices !

But which Ethernet cable to use ?????

Straight Cable or Crossover Cable ????????

It may be confusing for many of us !!!!!

But Guys !!!! There is a simple method to figure it out !

Before that lets see what is Straight Cable and Crossover Cable

There are two standards adopted for Cabling EIA/TIA 568A & EIA/TIA 568B.

When you use single standard (either EIA/TIA 568A or EIA/TIA 568B) on both the end of cable then the resulting cable is STRAIGHT CABLE.


On the other hand if you use different cabling standard on the ends of cable then the resulting cable is CROSS CABLE


Now lets go back to our topic

Guys ! To figure out which cable to use

Always Remember

Same Devices - Use Crossover Cable

Different Devices - Use Straight Cable


So lets see which cable to use while connecting different Networking devices

1) Switch to Switch =  Crossover Cable

2) Router to Router =  Crossover Cable

3) Switch to Router =  Straight Cable

4) PC to PC =  Crossover Cable

5) Switch to PC = Straight Cable

6) Router to PC = Crossover Cable ( since they both have same components)

Thanks for Reading

amartechstuff

Monday, 3 August 2020

ADD YOUR OWN LOCAL PC IN GNS3 !! ITS EASY & SUPER COOL

Wondering how you could add your own local PC in GNS3 and use it !

Its easy and super cool !!!!!

Just Follow Below Steps


Part 1 – Need to create a Microsoft loopback adapter in our desktop.


⦁    Step 1 – Open hardware wizard

In cmd prompt type hdwwiz.exe and press enter.


Or start and search or hddwiz and click on same to open the hardware wizard


⦁    Step 2:- Enter into the setup of Hardware Wizard


⦁    Step 3:- Install the hardware (manually)


⦁    Step 4:- Select Network Adapters


⦁    Step 5:- Select Microsoft > Microsoft Loopback Adapter


⦁    Step 6:- Click Next


⦁    Step 7:-Click Finish to create Microsoft Loopback Adapter


Part 2 – Assign IP address to Microsoft loopback  adapter in our desktop.


⦁    Step 1 :-  Network and Sharing Center  Change adapter settings


⦁    Step 2:-Internet Protocol Version 4 (TCP/IPV4)


⦁    Step 3:-Assign the IP address


⦁    Step 4:- Verification


Part 3 – Adding our desktop in GNS3.


Cloud is our desktop


Once done !!!!!Now able to connect and ping


Thanks for Reading !!!!

AMARTECHSTUFF